Objective
The end goal is get our own Qt application running on a Raspberry Pi with a touch screen device. There are two things we need to accomplish to make this happen.
- Cross Compile Qt - Build Qt on the host machine and move these binaries, libraries, and plugins to the Raspberry Pi to support the executable we want to run.
- Configure QtCreator on Host Machine - We need to create a “kit” on the host machine QtCreator application that contains everything we need to cross compile our application, including gcc and g++ which are designed for the target architecture.
NOTE: During this process, I consulted several different tutorials online. Unfortunately, most of the tutorials I found were for either a different version of Qt, a different version of the Raspberry Pi, a different version of Raspian, or some combination of the three. I’ve combined pieces of information that I’ve found with some problem solving and research I had to do myself to get it to work for my own version of Qt, Raspberry Pi, and Raspian.
Development Environment
- Host Machine - Ubuntu 18.04.3 VirtualBox VM
- Target Device - Raspberry Pi 3 Model B Rev 1.2
- Target CPU - BCM2837
- Target OS - Raspian GNU/Linux 10 (buster)
- Qt - 5.12.6 for Embedded Linux
- QtCreator - 4.11.1
My host machine was connected to my corporate network via ethernet and the NAT network mode was set on the Ubuntu VM. The Raspberry Pi was connected to the same network via ethernet. The two could talk to each other over the network, which meant I could make use of the rsync utility for moving relevant files between the two and the SD Card could stay where it belonged.
Preliminaries
- Ensure the firmware on the Raspberry Pi is updated with
sudo rpi-updateand thenreboot - Ensure you have the SSH protocol activated on the Pi by running
sudo raspi-config, selecting interfacing options, selecting ssh, and selecting yes, then finish
(1) Installation of Libraries [Raspberry Pi]
This is just a basic installation of development libraries we will need for building and developing in Qt.
First, we need to edit /etc/apt/sources.list and uncomment the line beginning with deb-src with
sudo nano /etc/apt/sources.list
We now need to perform an update and install a number of libraries.
sudo apt update
sudo apt build-dep qt4-x11
sudo apt build-dep libqt5gui5
sudo apt install libudev-dev libinput-dev libts-dev libxcb-xinerama0-dev libxcb-xinerama0
(2) Create Target Directory [Raspberry Pi]
On the Pi, we need to create a folder that will contain the custom built Qt which will be deployed from the host machine. The folder is owned by the pi user.
sudo mkdir /usr/local/qt5pi
sudo chown pi:pi /usr/local/qt5pi
(3) Create Target Directory [Host Machine]
On our host machine, we need to create a folder somewhere, in this case the home directory, for working with the Raspberry Pi. We then need to clone the Raspberry Pi tools hosted on Github into it.
mkdir ~/raspi
cd ~/raspi
git clone https://github.com/raspberrypi/tools
(4) Create a Sysroot and Sync with the Pi [Host Machine]
A sysroot is a directory structure that serves as a root directory for locating relevant headers and libraries. The sysroot we are creating on our host machine is for the cross compilation of Qt for the Raspberry Pi. This sysroot folder should be inside of ~/raspi
mkdir sysroot sysroot/usr sysroot/opt
The rsync utility is used to synchronize the sysroot folder we just created with the appropriate files on the Raspberry Pi. If we make changes in our sysroot folder, we can sync back up with the corresponding folders on the Pi.
rsync -avz pi@<PI_IP_ADDR>:/lib sysroot
rsync -avz pi@<PI_IP_ADDR>:/usr/include sysroot/usr
rsync -avz pi@<PI_IP_ADDR>:/usr/lib sysroot/usr
rsync -avz pi@<PI_IP_ADDR>:/opt/vc sysroot/opt
Now, we should be inside of the ~/raspi directory and there should be a folder sysroot/ that contains the folders from the Raspberry Pi.
(5) Make Symbolic Links Relative [Host Machine]
We need to make the symbolic links in the folders we downloaded from the Raspberry Pi. We can easily do this by using a Python script from Github.
wget https://raw.githubusercontent.com/riscv/riscv-poky/master/scripts/sysroot-relativelinks.py
chmod +x sysroot-relativelinks.py
./sysroot-relativelinks.py sysroot
(6) Download Qt [Host Machine]
Let’s leave the ~/raspi folder, going back into our home directory, and download Qt using Git and go into this folder.
cd ..
git clone git://code.qt.io/qt/qtbase.git -b 5.12.6
cd qtbase/
(7) Edit qmake.conf [Host Machine]
The EGL libraries on the newest version of Raspian have a different name than those in the Qt configuration files, so we need to edit the qmake.conf file and make some substitutions for -lEGL and -LGLESv2, changing them to -lbrcmEGL and -lbrcmGLESv2. We also need to add in two linker flags for qmake. This is the final result, which you can just copy and paste into the qmake.conf file, the one we are using being located at /qtbase/mkspecs/devices/linux-rasp-pi3-g++/qmake.conf:
# qmake configuration for the Raspberry Pi 3 using the Broadcom graphics stack

include(../common/linux_device_pre.conf)

# For modern Yocto-based sysroots that have the proper include and lib
# setup in egl.pc we will pull the necessary arguments from
# there. However, to support Raspbian and older stuff that has /opt/vc
# and possibly no pkg-config, have some static values as well:

# I consider it a bug that this is required, but our EGL config.test _requires_ it
QMAKE_RPATHLINKDIR_POST += $$[QT_SYSROOT]/opt/vc/lib

QMAKE_LFLAGS           += -Wl,-rpath-link,$$[QT_SYSROOT]/opt/vc/lib
QMAKE_LFLAGS           += -Wl,-rpath-link,$$[QT_SYSROOT]/home/pi/qtdeps/lib

VC_LIBRARY_PATH         = /opt/vc/lib
VC_INCLUDE_PATH         = =/opt/vc/include

VC_LINK_LINE            = -L=$${VC_LIBRARY_PATH}

QMAKE_LIBDIR_OPENGL_ES2 = =$${VC_LIBRARY_PATH}
QMAKE_LIBDIR_EGL        = $$QMAKE_LIBDIR_OPENGL_ES2
QMAKE_LIBDIR_OPENVG     = $$QMAKE_LIBDIR_OPENGL_ES2

QMAKE_INCDIR_EGL        = \
                        $${VC_INCLUDE_PATH} \
                        $${VC_INCLUDE_PATH}/interface/vcos/pthreads \
                        $${VC_INCLUDE_PATH}/interface/vmcs_host/linux

QMAKE_INCDIR_OPENGL_ES2 = $${QMAKE_INCDIR_EGL}

QMAKE_LIBS_OPENGL_ES2   = $${VC_LINK_LINE} -lbrcmGLESv2

# The official opt vc EGL references GLESv2 symbols: need to link it
QMAKE_LIBS_EGL          = $${VC_LINK_LINE} -lbrcmEGL -lbrcmGLESv2

QMAKE_LIBDIR_BCM_HOST   = =$$VC_LIBRARY_PATH
QMAKE_INCDIR_BCM_HOST   = $$VC_INCLUDE_PATH
QMAKE_LIBS_BCM_HOST     = -lbcm_host

QMAKE_CFLAGS            = -march=armv8-a -mtune=cortex-a53 -mfpu=crypto-neon-fp-armv8
QMAKE_CXXFLAGS          = $$QMAKE_CFLAGS

DISTRO_OPTS            += hard-float
DISTRO_OPTS            += deb-multi-arch

EGLFS_DEVICE_INTEGRATION= eglfs_brcm

include(../common/linux_arm_device_post.conf)

load(qt_config)
(8) Compile, Make, and Install Qt [Host Machine]
Now we’re going to perform magic to cross compile Qt for the Raspberry Pi within our qtbase/ folder.
This is a long process, so you might want to do other stuff in the meantime like a BL4 run through Bloodborne using the Saw Cleaver.

There are the 3 commands that you will perform, one at a time. If anything goes wrong, you can undo and clean up with the command git clean -dfx and make clean if necessary.
./configure -release -opengl es2 -device linux-rasp-pi3-g++ -device-option CROSS_COMPILE=~/raspi/tools/arm-bcm2708/gcc-linaro-arm-linux-gnueabihf-raspbian-x64/bin/arm-linux-gnueabihf- -sysroot ~/raspi/sysroot -opensource -confirm-license -make libs -prefix /usr/local/qt5pi -extprefix ~/raspi/qt5pi -hostprefix ~/raspi/qt5 -no-use-gold-linker -v
make -j4
make install
(9) Deploy Compiled Qt to Raspberry Pi [Host Machine]
Now we can go back into the ~/raspi folder and sync everything from the newly created qt5pi/ folder into the Raspberry Pi.
cd ~/raspi
rsync -avz qt5pi pi@<PI_IP_ADDR>:/usr/local
(10) Update Linker on the Raspberry Pi [Raspberry Pi]
After those files get transferred, we need to update the device to let the linker find the Qt libraries.
echo /usr/local/qt5pi/lib | sudo tee /etc/ld.so.conf.d/qt5pi.conf
sudo ldconfig
(11) Download and Install Qt Creator [Host Machine]
Download Qt Creator 4.11.1 for Linux x64 and change the file to be executable before running it. Follow the standard installation steps.
(12) Add Raspberry Pi gcc/g++ to PATH [Host Machine]
We need to add the two compilers we will be using to cross compile Qt applications to your path environment variable.
export PATH=$PATH:~/raspi/tools/arm-bcm2708/gcc-linaro-arm-linux-gnueabihf-raspbian-x64/bin
(13) configure Qt Creator for Cross Compilation and Deployment [Host Machine]
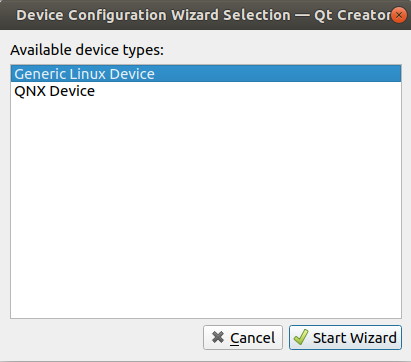
- Open Qt Creator and navigate to Tools -> Options -> Devices -> Add… and add a new Generic Linux Device
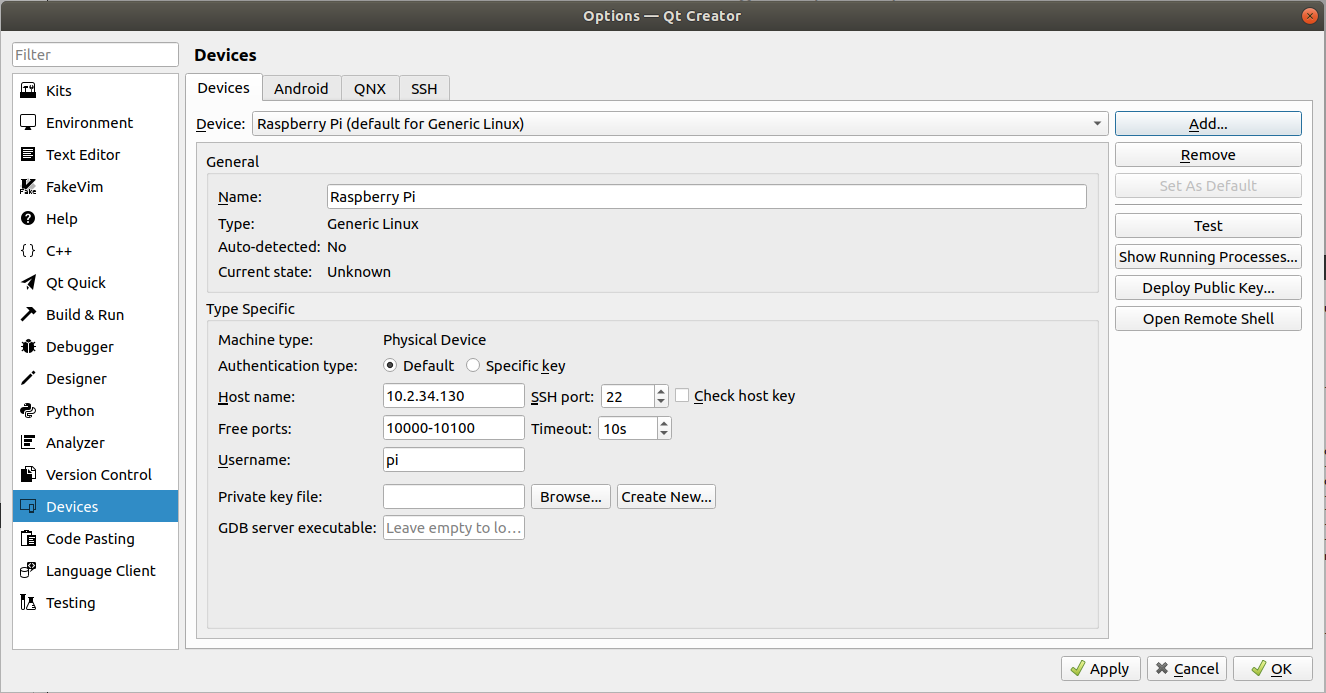
- Fill in the information for the Raspberry Pi device. The host name is the IP address of the device. The final result should look something like this.
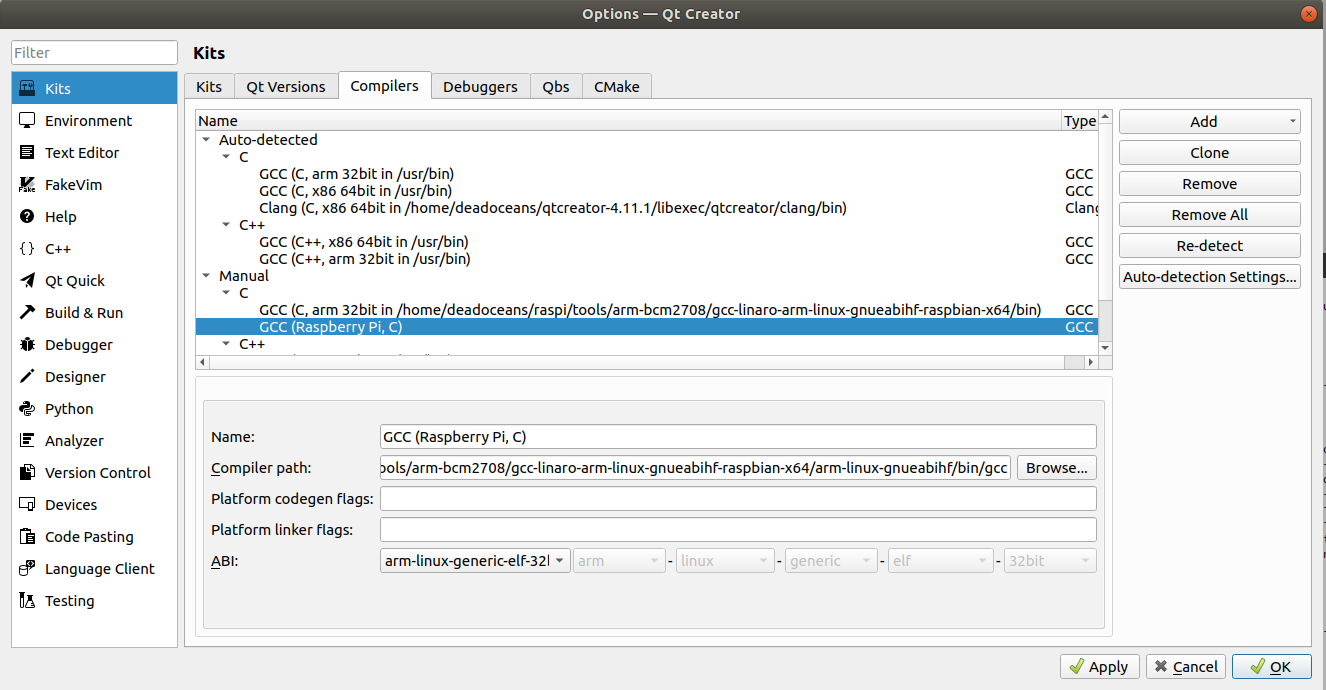
- We need to add the C and C++ compilers from the Raspberry Pi tools folder so we can cross compile an executable. First, we add the C compiler, which is located at
~/raspi/tools/arm-bcm2708/gcc-linaro-arm-linux-gnueabihf-raspbian-x64/arm-linux-gnueabihf/bin/gccand we can call this compiler GCC (Raspberry Pi, C)
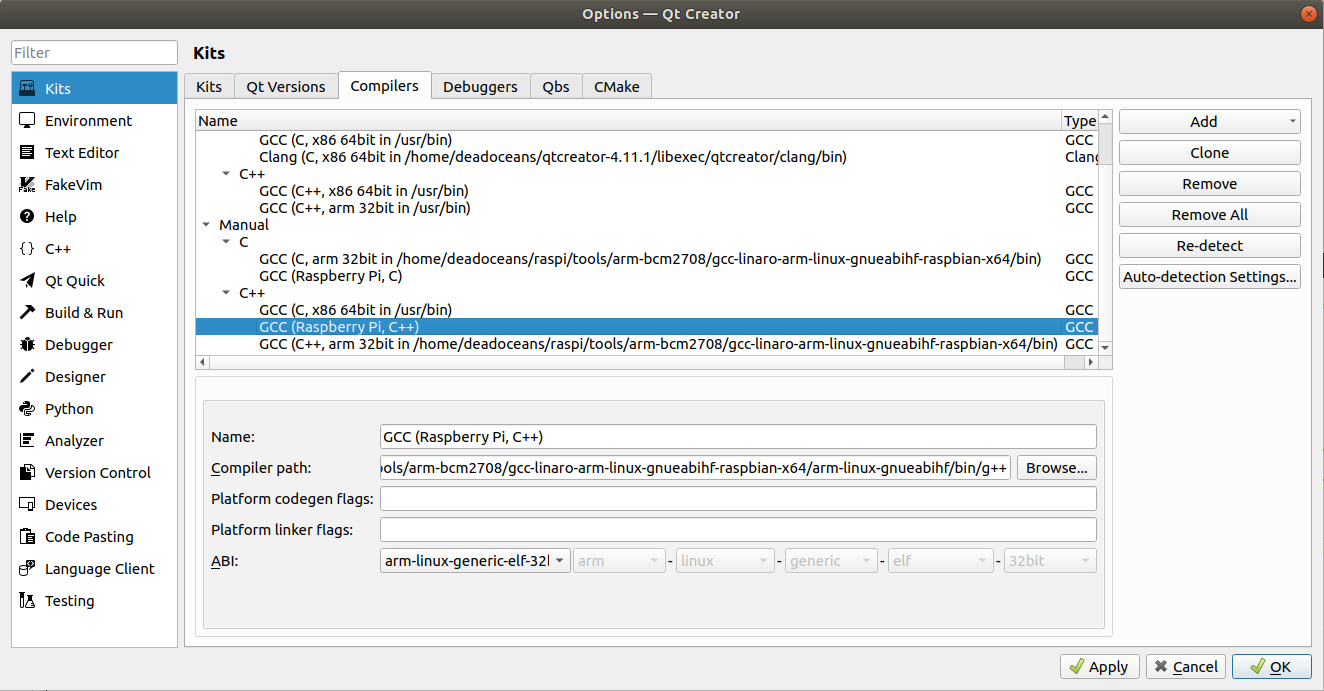
- We then add the C++ compiler which is located in the same directory at
~/raspi/tools/arm-bcm2708/gcc-linaro-arm-linux-gnueabihf-raspbian-x64/arm-linux-gnueabihf/bin/g++
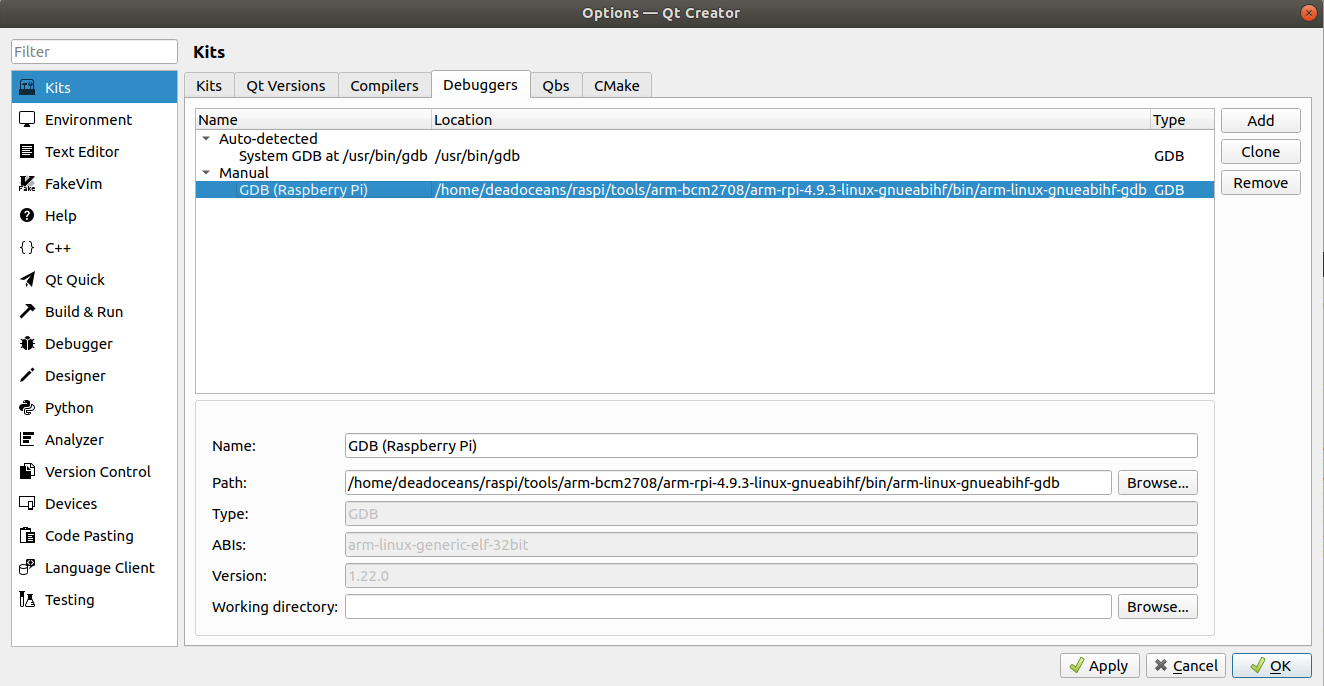
- Next, we add the Raspberry Pi debugger, located at
~/raspi/tools/arm-bcm2708/arm-rpi-4.9.3-linux-gnueabihf/bin/arm-linux-gnueabihf-gdb
- We then add the correct version of qmake, located at
~/raspi/qt5/bin/qmake

- Using all of these specifications, we can configure a “kit” in QtCreator. We go to the Kits tab and add a new kit called Raspberry Pi, giving it the correct sysroot of
~/raspi/sysroot, and the correct compilers, GDB, and Qt version that we added in earlier steps, which should now populate the dropdowns.
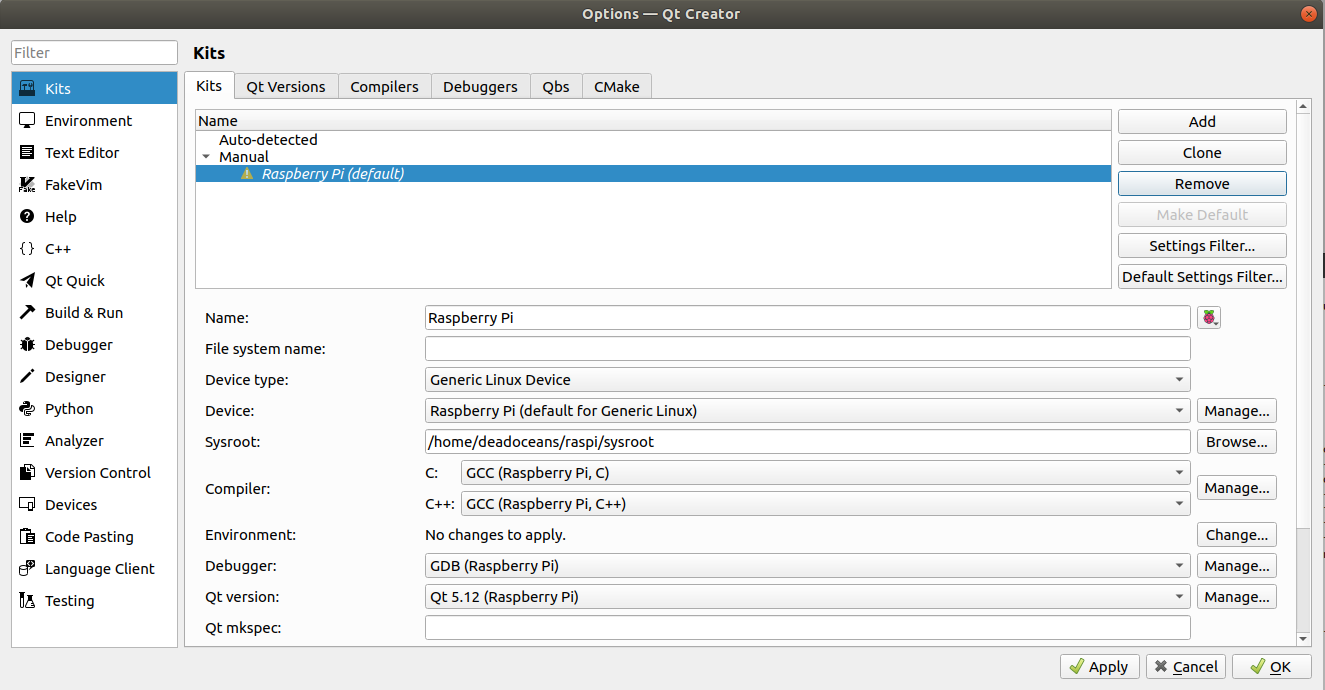
You should now be able to configure some project with this Kit and cross compile it and deploy it onto the Raspberry Pi.
Deploying a QtQuick Application
For my embedded application, I wanted to integrate QML because I’ve had a smooth experience using it for the front-end in past applications, especially liking the property bindings that took place between QML and C++. To use QML, I needed to build and deploy a few other Qt modules to the Raspberry Pi, specifically QtDeclarative, QtGraphicalEffects, and QtQuickControls2, in that order. QtQuickControls2 depends on QtGraphicalEffects which seemed to require QtDeclarative. I also wanted to use a virtual keyboard in the embedded application, which required the modules QtSvg and QtVirtualKeyboard.
For each of the three modules, I performed the following steps:
# where <QT_MODULE> == {qtdeclarative,
                        qtgraphicaleffects,
                        qtquickcontrols2,
                        qtsvg,
                        qtvirtualkeyboard}

git clone git://code.qt.io/qt/<QT_MODULE>.git -b 5.12.6
cd <QT_MODULE>

~/raspi/qt5/bin/qmake

make
make install
Finally, I deployed these modules to the Raspberry Pi using rsync like last time:
rsync -avz qt5pi pi@<PI_IP_ADDR>:/usr/local
That’s it. You should be able to successfully build and run a QtQuick2 application on your Raspberry Pi device.
A Note on Touch Screen Rotation
If we want to run an application that’s in portrait mode instead of the normal landscape mode of a touch screen device, we need to adjust some parameters in the /boot/config.txt file.
The parameters that need to be adjusted in this file are a line that rotates the display itself and a line that calibrates the touch screen to register touch events on a rotated display. Edit /boot/config.txt as sudo:
sudo nano /boot/config.txt
And add the lines:
display_lcd_rotate=1
dtoverlay=rpi-ft5406, touchscreen-swapped-x-y=1, touchscreen-inverted-x=1
Then save the file and reboot.
The device should reboot into portrait mode and applications should also run as such.